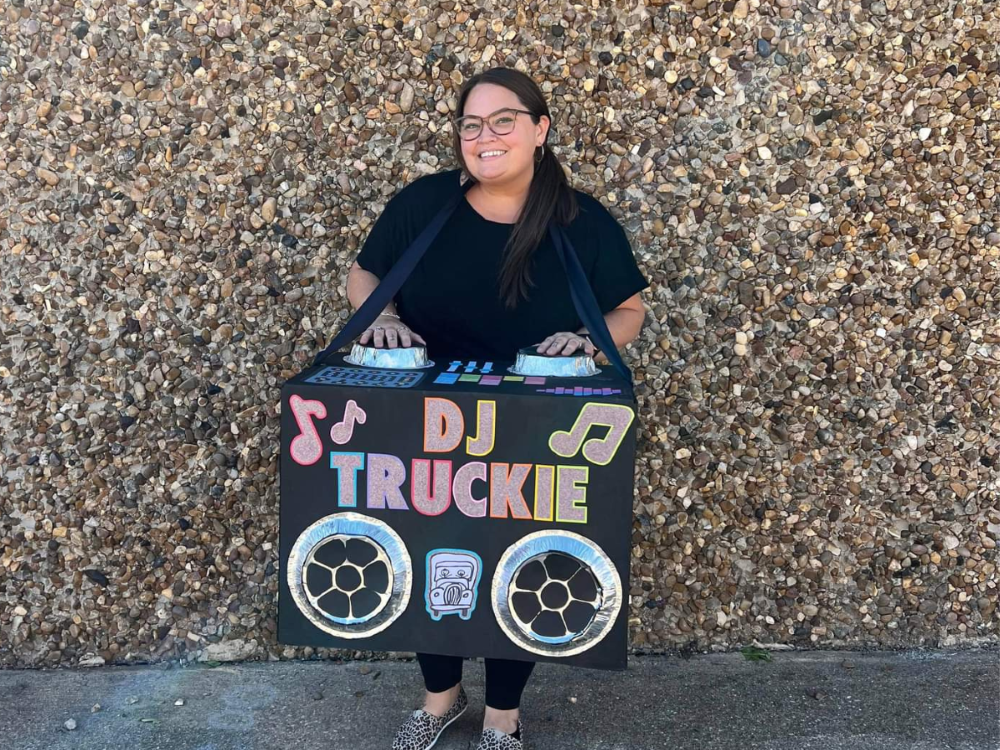
Get ready to drop the beat this Halloween with your very own DJ Truckie Boxtume! This fun and interactive costume transforms a simple cardboard box into a DJ booth, complete with turntables, speakers, and a cool DJ setup. Perfect for anyone who wants to make an impression with a unique, DIY costume. Follow this step-by-step guide to create your DJ Truckie look.
Materials You'll Need:
Large cardboard box (big enough to fit around your torso)
Small cardboard pieces for details (turntables, buttons, etc.)
Acrylic paint (black, silver, and colors of your choice)
Paintbrushes
Black marker or silver metallic marker
Glue gun and glue sticks
Scissors or box cutter
Elastic or ribbon (to secure the costume)
Old CDs or plastic lids (for turntables)
String lights or glow sticks (optional, for added flair)
Directions
Step 1: Prepare the Cardboard Box
Start by cutting out the bottom of the large cardboard box so that it fits over your torso, resting comfortably around your waist. Cut a semi-circle or rectangle in the front at waist height to create a "DJ booth" opening where your hands will go, as if you're behind the DJ table.
Step 2: Create the DJ Booth Setup
Next, design the top of your DJ booth. You can either leave it flat or make a slightly angled top for a more realistic DJ feel. Add two circles for the turntables by gluing on old CDs, plastic lids, or round cardboard cutouts. Use small cardboard pieces to create knobs, buttons, and sliders. Attach these details to the top surface with hot glue.
Step 3: Decorate the DJ Booth
Paint the outside of your cardboard box with black acrylic paint to create the look of a sleek DJ booth. Once dry, use silver or metallic paint to add details like buttons, sliders, and speaker outlines. You can also add your DJ name (like "DJ Truckie") in bold letters using a black or silver marker. Get creative with neon colors, stickers, or stencils to make it pop!
Step 4: Add the Speakers
Cut out two large rectangles from the sides of the box to create the illusion of built-in speakers. Paint them black or silver and use a marker to draw speaker cones. For a more authentic look, glue extra layers of cardboard circles onto the speaker area to give them a 3D effect.
Step 5: Lighting and Effects (Optional)
For extra flair, consider adding string lights or glow sticks around the edges of your DJ booth. This will give it a glowing, party vibe, perfect for nighttime events or Halloween parties. Simply glue or tape the lights around the perimeter of the box.
Step 6: Secure the Costume
To wear your DJ Truckie Boxtume, attach elastic or ribbon straps to the sides of the box. Measure and cut the straps so they comfortably sit on your shoulders, like suspenders, holding the box in place while you move around. Be sure to test the fit and adjust as needed.
Step 7: Final Touches
Finish off your DJ look with some classic DJ accessories! You can wear a pair of headphones around your neck, a cool hat, or even sunglasses to really embody the DJ persona. If you want to take it to the next level, bring along a playlist of your favorite tunes to get the party started!
Now you’re ready to rock the party as DJ Truckie! This easy-to-make Boxtume will definitely be a hit, whether you're trick-or-treating or spinning imaginary records at a Halloween bash. Turn up the volume on fun with your DIY DJ booth, and enjoy the spotlight!


